Showing posts with label McAfee. Show all posts

Friday, June 27, 2014

McAfee Next Generation Firewall (Stonesoft): Load balancing and QoS using Multi-Link


Overview

McAfee Multi-Link is a very useful feature for organization that need reliable and scalable internet connection. It's reliable since it allows user to have seamless internet connectivity during downtime of their primary ISP. It is scable since organization can easily add a new ISP over their existing without downtime.

The following videos will show you how to configure Multi-Link in various requirements

Note: For diagram, kindly reference to this post: http://nidofortified.blogspot.com/2014/06/configuring-mcafee-next-generation.html

Requirement 1: I want to make sure all High Priority traffic to pass on my ISP with larger bandwidth

In this video, I will show you how to use Multi-Link ratio mode with QoS.

I change my ISP A netlink bandwidth information from 100kbps into 300kbps
After security engine refresh, notice now that the NAT source IP change.

Requirement 2: I want to use QoS on my firewall policy

If you want to make sure that specific rule is being route on your most reliable or larger pipe ISP,
Make sure first that you applied QoS on your rule.

After that. Modify your Multi-Link to choose which ISP will handle your QoS.
Refresh security engine and verify it on your log viewer.


So that's it for now, if you have any question or have requirements you need to check if NGFW can support, just leave a comment. :-)

Thursday, June 19, 2014

Configuring McAfee Next Generation Firewall (Stonesoft) Multi-Link Feature

Overview

Multi-Link is a unique feature for McAfee NGFW. It helps organization reduce cost from buying large bandwidth from ISP. This is done by combining multiple ISP to create a single route for all network traffic.
Aside from reducing cost, it also improves reliability for organization that needs 24/7 operations since its capable enough to switch automatically on active/best ISP link.

Multi-Link also enables organization to have augmented VPN which again help improve operations and reliability.

Last, but not the least, Multi-Link can also be use for inbound traffic. So for example, you can have multiple link/route going to your web server to avoid service downtime for external users/costumers.

For more info, visit McAfee NGFW site here: http://www.mcafee.com/us/products/network-security/next-generation-firewall-technologies/multi-link.aspx

Configuration

Configuring Multi-Link is very simple, you will just need typically a multiple ISP connection and a popcorn (yes a popcorn, watching the logs as being load balance by NGFW by default :-) )

For this tutorial, my environment will have 2 ISP. ISP A will have 50kbps UP and 100kbps DOWN while ISP B will have 100kbps UP and 200kbps DOWN but has 1 extra hop before reaching the internet.


Now that you have an idea about my test environment, let's proceed for the configuration.

Step 1: Configure Physical Interface IP

Provide the IP address that will communicate on external network.

Step 2: Configure NetLinks

Just like adding normal static route, right click on the interface network and choose New -> Static Netlink (as shown below)
Note: There are two types of Netlink. Static and Dynamic, what they do will be discuss on separate tutorial.

A pop-up window will show for NetLink configuration.

Name - The unique name for this NetLink
Gateway - The next-hop IP address (Mostly your ISP router IP)
Network - The network segment given/assigned by your ISP
Probing settings - Useful for identifying active links and measuring the speed of each link.
Note: When adding IP address for probing, it is recommended to put IP address from external server instead of using the ISP router address (i.e. ISP router connection is not reliable since during downtime, you can still probably ping your ISP but does not have internet connection)
Input speed - The incoming bandwidth speed of this ISP
Output speed - The outgoing bandwidth speed for this ISP
Note: Placing a speed is mandatory if you need to configure QoS/load balancing

Click Ok then repeat steps in creating another NetLink for ISP B.
Below is an example of a complete NetLink configuration

Step 3: Creating Outbound Multi-Link

Select Outbound Multi-Link
Add the NetLink created for each ISP
From the NetLink Member window, provide the IP range that can be use by Multi-Link. The above shows that I only want single IP address to be use by my firewall. Leave QoS blank for now and click Ok.

Step 4: Creating NAT Rule

With this rule, it is saying that any outgoing connection will use either of the two ISP connection.

Step 5: Test Configuration

Start browsing and view the logs from SMC. You will notice here that the outgoing traffic is being NATed by different external IP of the firewall.

And that's it! You now have Multi-Link enabled for Outbound traffic.

I will update again this post to show you how I configured NGFW to solve the following scenario. Should you have request for certain scenario, do leave your comment. :-)

Scenario A: Apply Load Balancing
Scenario B: Restrict Specific Traffic from Specific Link
Update 1:
I combined Scenario A and B to this single post: Advance Setting for McAfee NGFW Multi-Link

Wednesday, May 28, 2014

Configuring McAfee NGFW (Stonesoft) Client to Site VPN (using Stonesoft IPSec VPN Client): Configuring VPN NAT Pool based client-to-site VPN

Overview

Stonesoft IPSec VPN in NAT Pool is an alternate of allowing remote users to establish VPN connection. This configuration does not require external DHCP server to provide IP for remote users. 

The disadvantage of using this configuration is the manual setup of DNS server on the remote user.

Requirements

McAfee NGFW 5.5 and later
McAfee Security Management Center (SMC) 5.7
Stonesoft IPSec VPN Client 5.4 or later

Procedures

  1. Log-on to McAfee SMC
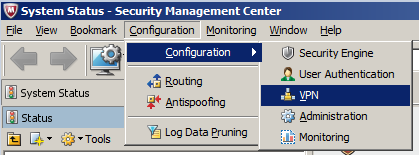
  2. Go to Configuration -> Configuration -> VPN
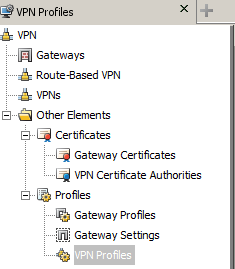
  1. Create a new VPN Profile by going to Other Elements -> Profiles -> VPN Profiles
Then Right-Click on VPN Profiles to choose New VPN Profile
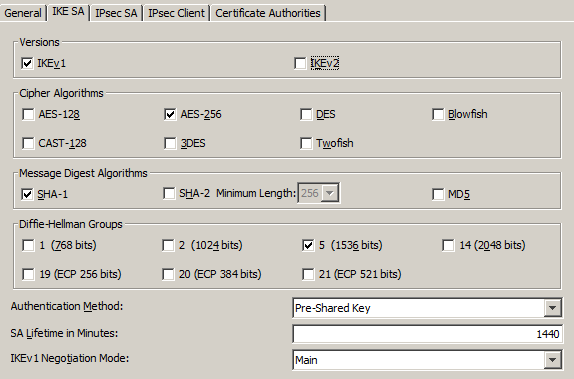
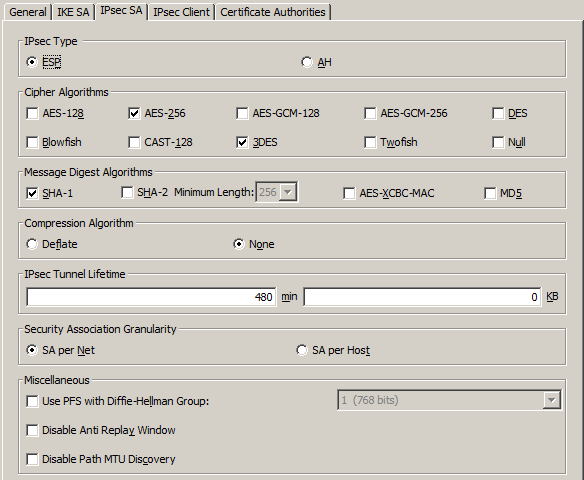
  1. On the new window, configure the following: (You may change the following depending on your security requirements)


Then click Ok

  1. Create a new VPN configuration, right-click on VPNs then choose New VPN
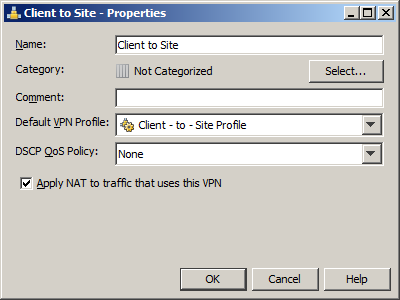
Choose the VPN Profile that was created earlier
Make sure to enable the checkbox when configuring VPN for NAT Pool

  1. On the Edit view for the VPN configuration,

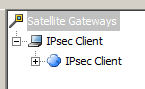
Add the default IPSec Client on the Satellite Gateways

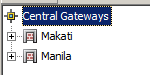
Create a new Internal VPN Gateway for the Central Gateways

Select the Security Engine (Firewall) that will be access by the remote users

Select the public (external) IP address that will be handling the VPN session

Uncheck the “Include and update addresses based on routing” since this will allow any remote user to access any network
If the VPN rule are not configured properly.

Add the network segment that you will be allowing network user to access.

Click Ok.

You may add multiple internal gateway if you manage multiple NGFW
  1. Set IP range that can be used by the remote users.
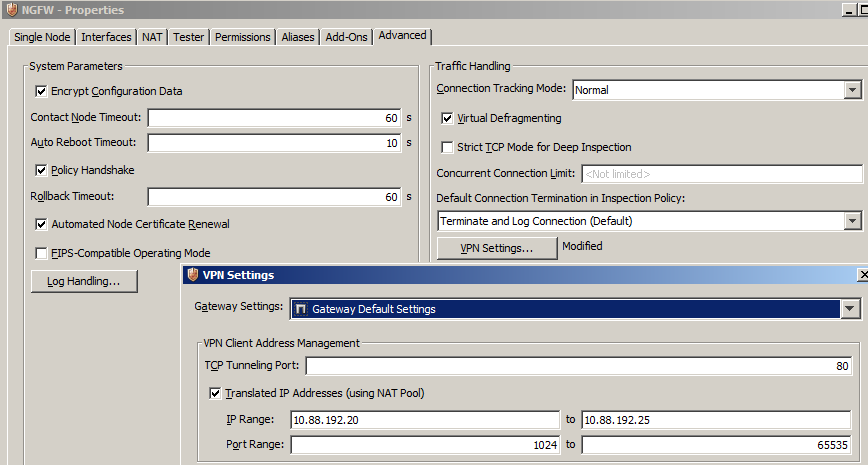
Go to NGFW properties, Advanced tab then click VPN Settings button.

Check the “Translated IP Addresses”, place the IP range and port range (from 1024 to 65535)

Click Ok.

  1. Create VPN users account locally on the firewall
Go to Configuration -> Configuration -> User Authentication

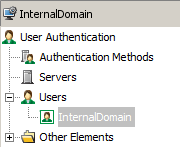
To create a new local user account, expand Users then choose InternalDomain

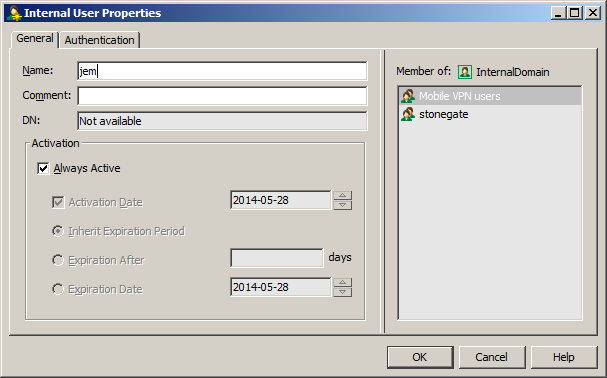
Expand stonegate domain then create a new user under Mobile VPN user

Input username on the Name field, modify the Activation based on your requirement.

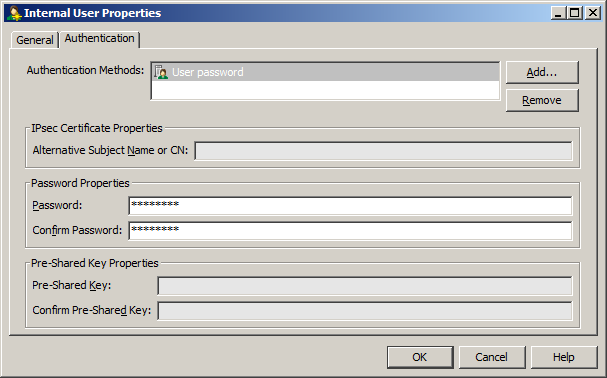
Set user authentication as User password then initialize the user’s password (take note of this so you can send it to the user afterwards)

A successful user authentication will show the following

  1. Create a new rule on your current Firewall Policy that will have the following configuration
Source IP: Any
Destination IP:
Service: Any
Action: Enforce VPN: Client to Site
Authentication: Select Authorize Client IP, Select the Group where the VPN users are stored, Choose the authentication type being use by the user

  1. Upload the rule to your firewall
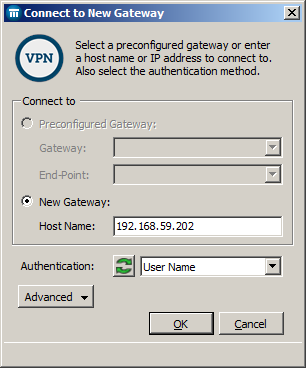
  2. Test your VPN setting by connecting via Stonesoft VPN client

Input the public IP of the firewall that will accept VPN connection

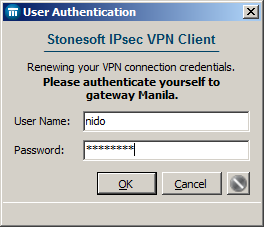
Successful connection will prompt user authentication dialog

Successful authentication will establish connection

You should now able to access the server/workstation behind the firewall

Note: Unlike other IPSec VPN client, Stonesoft’s client will not disconnect your internet connection or will reconfigure the IP address of your network interface. So while you can access the internal network, you may still continue to access the Internet.

Wednesday, March 5, 2014

Open Source IDS/IPS With Real Time Log Monitoring: Suricata and Logstash

Background

Last week, I was trying to learn more about McAfee's Network Security Platform. It is one of the best network security solution available in the market. Simple, yet powerful and has a wide array of appliance that will fit to any size or requirement by their customer.

As the title say, this post is not about McAfee NSP. I wrote this post to share my experience in setting up an IDS/IPS appliance for home (or even for SMB) use. Why I did this? Simple, I was curious what kind of attacks or traffic found in an ordinary user. Since nowadays, we are in a digital world and most of us are doing transactions online. How safe are we doing it? Also, how about if my workstation is infected with malware, how does it behave on my network?

Going open source!

Since of course I cannot afford buying my own Network IPS or even if I do, I cannot run it for a day due to expensive electricity. I end up searching for an open source solution. Lucky for me, I found Suricata! Suricata is an open source IDS/IPS and even NSM engine that runs on multiple platform. (Homepage: http://suricata-ids.org/) It officially supports the following:

- Ubuntu
- Debian
- CentOS
- Fedora
- FreeBSD
- Mac OS
- Windows

You can also compile your own if you are using other platform.

Setting it up!

For this tutorial, I am using Ubuntu 10.04 LTS as my platform. There is a precompiled version of Suricata for Ubuntu, but in my case, I compiled my own binary for the sake of learning.

Suricata does not come its own dashboard for viewing alert or event logs. Good thing, we have logstash that fully supports the log it generates. (logstash: http://logstash.net/) which will be cover also in this tutorial. :-)

There will be 4 part for this tutorial:
Part 1: Planning and installation
Part 2: Setup and Configure Suricata
Part 3: Setup and Configure Logstash
Part 4: Fine tuning

At the end of this tutorial, you should have a similar dashboard like this:

Nice huh? :) Stay tune for the tutorial or if you are the kind of person who really want to setup this then I recommend you visit Suricata website and read their basic tutorial. Until then, good day!

Saturday, February 22, 2014

Using McAfee Firewall Enterprise Application Control - Case Study: Why using HTTP.Tunnel work before and now it won't after the MFE application DB update?

What is HTTP Tunnel?

HTTP Tunnel is not HTTPS; it is a separate program used to tunnel non-HTTP traffic over HTTP use by individual or corporation to tunnel network connections using HTTP/s to bypass filtering by firewall. Think of it as an anonymizer programs that user can use in order to have internet access on a restrictive environment. The difference is, this can be use by developers to integrate it on their application.

Because this is treated as an actual application (and not a tunneling "protocol" like SSL/TLS), MFE Application DB has its "signature" stored so that it can quickly identify and do action when it recognize that the traffic passing on the network originate from an HTTP Tunnel application (This applies to other application as well)

So why can you access the internet or web server when using HTTP.Tunnel, is MFE broken?
When you access a certain website (internet or intranet), MFE scan the traffic passing on it. Since it evaluated that the site is not a web application or a known application (e.g. 4Shared, Dropbox, or Google Drive) MFE will flag it as a normal HTTP or an HTTPS traffic because it is using port 80 and 443. The risk here is, it will work 50-50. When MFE detects that the traffic shares a similarity on one of its application signature (especially after application DB update), the traffic will be drop since only HTTP.Tunnel is allowed.
When accessing an internal site, it is recommended to use a similar policy shown on the right since it's telling that all traffic going on that server is an HTTP/s request and it's a trusted site already.

As a proof, you can try using other application signature that utilize HTTP(80) and SSL/TLS(443) to browse the internet and it will work, but browse on a known application signature, it will be drop.

What is the correct application to use?
The answer is, use HTTP and SSL/TLS application (or custom application/port)  to handle traffic going to a specific website or web server (webmail, web portal and so on..) As an example, below are the different scenario wherein a comparison of each audit log on MFE when using HTTP tunnel and the combination of HTTP and SSL/TLS

For the purpose of this example, the website that's being trying to access is Dropbox

Scenario 1: Enabled Application Discovery on internet and internal zone, then use HTTP and SSL/TLS application on the policy

Fig. 1

Fig 2
Figure 1 shows audit report is clean of alerts and errors. With the help of application discovery, MFE can properly identify that the website is Dropbox. While on Figure 2, it shows that this traffic is passing on port 443 and its allowed

Scenario 2: Enabled Application Discovery on internet and internal zone, then use HTTP.Tunnel application on the policy
Fig 3

Fig 4

Figure 3 shows that there are multiple attacks detected by MFE since it doesn't match any current policy it has. And this can be further analyze on Figure 4 which shows that this traffic passing on port 443 is a policy violation because it only allows HTTP.Tunnel application.

Scenario 3: Disabled Application Discovery on internet and internal zone, then use HTTP and SSL/TLS application on the policy
Fig 5

Fig 6

Figure 5 shows a similar clean audit logs like in Figure 1, the difference is, MFE tag the application field as a generic HTTPS traffic rather than Dropbox.

Scenario 3: Disabled Application Discovery on internet and internal zone, then use HTTP.Tunnel application on the policy
Fig 7

Fig 8

Figure 7 shows a similar audit log with Figure 3, it contains a lot of attack and alert events because of the wrong application being use on the policy. The interesting part on this scenario is that, even though application discovery is disabled, MFE is able to tag this as Dropbox. This further prove that MFE do scan the traffic passing on it to check if it matches on any signature it currently has. 

Closing Remarks
When creating a policy, identify what kind of service will the destination address will offer. This is very important to have not just a good list of firewall policy, but also a clean and understood one.

Enabling  Application Discovery on the MFE zone is good approach since it will able to identify traffic better. 


If you have questions or other inquiry, please feel free to leave your comment and I will response as quick as possible. Until then, take care!

Saturday, November 2, 2013

Slow DNS causing slow internet access

Overview

Last week, one of my client reported that their users were experiencing slow internet access even on non peak hours. For them, this is because there was a problem on our proxy solution provided (McAfee Web Gateway). I don't buy that. So what I did is to gather info first (like what a good IT guy would do) and then analyze each.

After some hour analyzing the result, it turns out that the culprit was their internal DNS! It seems their internal DNS is very slow in resolving each request sent by our proxy solution. This make user browsing experience very sloowwww. :(

Wednesday, October 23, 2013

Stonesoft, new McAfee family member!

So today, I was very excited to try what Stonesoft can offer. As everyone knows (or not) Stonesoft was recently acquired by McAfee (McAfee Press Release), with this move, it helps McAfee delivers NGFW and NGIPS to the global demand of network security solution.

Long story short, I'm very familiar with McAfee's current firewall solution which named McAfee Firewall Enterprise (MFE). This firewall is based on previously known Sidewinder firewall (which was acquired by